Flower-Shaped Treat Box How-To
- Apr 1, 2011
- 4 min read
One of the blogs that I read everyday is Prudent Baby. They have really cute projects and generally inspiring posts. They also have lots of contests for various prizes, but I usually don’t enter because their contests are usually sewing-related (and I am not a sewer–yet). However, on March 17th they announced a, “Sweet on Paper Contest,” to win an 11×17 Brother Printer. I really need a new printer, so I developed this flower-shaped box as my entry. The azaleas that are starting to bloom around our yard to signal the start of spring were an excellent source of inspiration.

To download the flower box template, please click here. ETA: To download the flower box template with treat dispenser, please click here (it’s slightly smaller to allow for printing a tab that goes inside the box to help secure it AND it has the dispenser pre-printed on the side) . There are four different versions: two, five-sided boxes and two, six-sided boxes in four exciting colors! (And if you happen to find my blog and this post, and you need this pattern in a different color combination, let me know. I will probably be able to help you out!) I drew the pattern in CAD software because I find it to be generally more precise than illustrator, especially at geometry. I then exported the DWG file to illustrator to create the final patterns. Voilà!
The folding is a little complicated, so I tried to take detailed pictures for this tutorial. Please excuse my weird fingers.
1. Print and cut out the flower-shaped box template.

Cut Out Template
2. Punch holes for lacing that hold box together. I didn’t print the holes on the template, because I don’t like to have ghost lines if you don’t line your punch up correctly. See the image below for the locations of the holes; I like to use a small 1/8″ hole-punch.

Location of Holes

Templates with Punched Holes
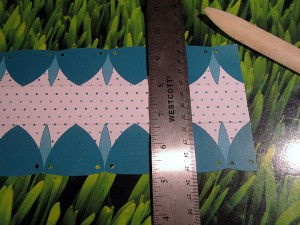
3. Then you need to score the template using a bone folder (the end of my bone folder is chipped, but it still works fine). Use a metal straight edge to keep your scores straight. In the template, these first scores are lined up with a row of polka dots. After you make the scores, go ahead and fold along the lines. Use the bone folder to make these folds extra crisp.

Scoring the Template - Step 1

Use a Metal Straight Edge to Make the Scores

Scored and Folded Template
4. The second set of scores/folds are perpendicular to the first. These folds are located down the middle of the larger “petals” on the template.

Second Set of Scores
Line up Straight Edge

Finished Second Set
5. The final set of scores/folds are along the edges of the larger petals. I hold the bone folder like a pencil and press down pretty hard as I freehand the petal edges. Shape the petals by folding along these scores before you begin to assemble the box.

Final Score Locations

Petal Scores Up Close

Shape the Petals

Petal Folds Coming Together

After the scoring/folding is complete
6. Assemble the bottom face of the flower box by threading a needle with some scrap yarn, ribbon, or thread. Run the needle through the pre-punched holes.

Lacing up the Bottom
7. After you lace all the holes, pull the yarn as tight as you can (without breaking the box).

Pull Tight
8. Tape edges together under box with a small piece of tape.

Tape Edge Together
9. Flip the box back over, pull thread tight, and tie a small knot to secure the bottom folds.

Tie a Knot to Secure
10. To create the center of the flower, tie a button (of any color) over your knot. Make a sort of mini-pompom for the “stamens” by wrapping some coordinating yarn around two fingers. Tie this yarn onto the button top, and then trim and clip the ends of the yarn.

Tie a Button Over Knot

Make a Mini Pompom

Tie Pompom Onto Button

Trim Yarn and Cut Loops

Finished Bottom of Box
11. To finish up the top of the box, flip it over. Tape edges of top of flower box together. Tape the tab on the side of the box to secure the box structure. Fill the box with treats, and lace the top holes together.

Tape Edge Together

Tape Tab on Side of Box

Fill Box with Treats and Lace Top Holes Together
12. Pull the laces tight. The top of the box should have a domed look. Finish off top of the box in the same manner as the bottom.

Pull the Thread Tight

Finish off top with Yarn and Button
13. How to add an optional side dispenser for your treats: After scoring and folding the box, fold over the side tab to see how much coverage you will get. Sketch in a small square to dispense the treats and a slit to secure the tab. Check the sketch with the side tab, and then cut out the square and slit with an x-acto knife.

Check Tab Location
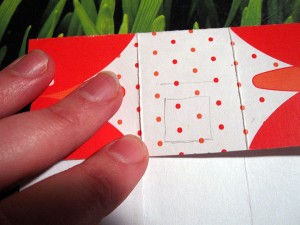
Make Sketch

Cut Box and Slit for Tab

Tab Covers Dispenser Box

Finished Box with Dispenser

Dispenser in Action
Hope you enjoyed my (overly?) detailed flower-shaped box tutorial. If you have any questions, let me know!


Comments